在如何使用小程序媒体组件 这篇文章中,我们介绍了小程序媒体组件的使用,但是对音频组件部分讲的不够详细,本文将对音频部分做些补充。
在教程开始之前,需要搭建搭建好小程序的基础开发环境,关于如何配置,大家可以参考如何入门小程序开发 这篇文章的入门 教程。
音频组件的使用 音频组件使用较为简单,在index.wxml文件中撰写调用audio组件即可。
1 <audio controls src ="audio>
有前端开发经验的小伙伴肯定能看懂,src中是我们要播放音频的地址,那么controls是什么意思呢?我们先看看官方的文档吧,如下表。
属性名
类型
默认值
说明
id
String
audio 组件的唯一标识符
src
String
要播放音频的资源地址
loop
Boolean
false
是否循环播放
controls
Boolean
false
是否显示默认控件
poster
String
默认控件上的音频封面的图片资源地址,如果 controls 属性值为 false 则设置 poster 无效
name
String
未知音频
默认控件上的音频名字,如果 controls 属性值为 false 则设置 name 无效
author
String
未知作者
默认控件上的作者名字,如果 controls 属性值为 false 则设置 author 无效
binderror
EventHandle
当发生错误时触发 error 事件,detail = {errMsg: MediaError.code}
bindplay
EventHandle
当开始/继续播放时触发play事件
bindpause
EventHandle
当暂停播放时触发 pause 事件
bindtimeupdate
EventHandle
当播放进度改变时触发 timeupdate 事件,detail = {currentTime, duration}
bindended
EventHandle
当播放到末尾时触发 ended 事件
原来,controls的意思是是否显示默认控件,默认值是不显示的,当我们写出controls才会显示播放的控件。当然,我们还可以为当前控件加入其它属性。
1 <audio controls src ="/i1.hdslb.com/bfs/archive/89252dadd2525f8190485a069f73cdf3d783cabc.jpg" name ="普通disco" author ="洛天依/言和" ></audio>
我们增加了音乐名称和作者,并给该音频配置了封面。为了优化代码,我们可以这样写。首先修改index.wxml文件如下。
1 <audio poster =" {{poster }} " name =" {{name }} " author =" {{author }} " src =" {{src }} " controls ></audio >
之后,我们将音频数据存储在index.js目录下,将下面的代码放在data{}之间。
1
2
3
4
poster: 'http://i1 .hdslb.com/bfs/archive/89252 dadd2525 f8190485 a069 f73 cdf3 d783 cabc.jpg', name: '普通disco', author: '洛天依/言和', src: 'https://qcloudbbs-10019892 .cos.ap-shanghai.myqcloud.com/%E6 %99 %AE %E9 %80 %9 ADisco%20 -%20 %E6 %B4 %9 B%E5 %A4 %A9 %E4 %BE %9 D%20 _%20 %E8 %A8 %80 %E5 %92 %8 C.mp3 ',
这时,我们就做到了前后端数据分离,后续可以实现更多功能,比如可以通过后端实现下一曲的功能。
index.wxml
1 2 <audio poster =" {{poster }} " name =" {{name }} " author =" {{author }} " src =" {{src }} " controls ></audio > <button bindtap ='next' > 下一曲</button >
index.js
1
2
3
4
5
6
7
8
9
10
11
12
13
14
15
16
17
18
19
20
21
22
23
24
25
26
27
28
data: { poster: 'http://i1 .hdslb.com/bfs/archive/89252 dadd2525 f8190485 a069 f73 cdf3 d783 cabc.jpg', name: '普通disco', author: '洛天依/言和', src: 'https://qcloudbbs-10019892 .cos.ap-shanghai.myqcloud.com/%E6 %99 %AE %E9 %80 %9 ADisco%20 -%20 %E6 %B4 %9 B%E5 %A4 %A9 %E4 %BE %9 D%20 _%20 %E8 %A8 %80 %E5 %92 %8 C.mp3 ', , = 0 = [{ poster: 'http://i1 .hdslb.com/bfs/archive/89252 dadd2525 f8190485 a069 f73 cdf3 d783 cabc.jpg', name: '普通disco', author: '洛天依/言和', src: 'https://qcloudbbs-10019892 .cos.ap-shanghai.myqcloud.com/%E6 %99 %AE %E9 %80 %9 ADisco%20 -%20 %E6 %B4 %9 B%E5 %A4 %A9 %E4 %BE %9 D%20 _%20 %E8 %A8 %80 %E5 %92 %8 C.mp3 ', , poster: 'http://y.gtimg.cn/music/photo_new/T002 R300 x 300 M000003 rsKF44 GyaSk.jpg?max_age= 2592000 ', name: '此时此刻', author: '许巍', src: 'http://ws.stream.qqmusic.qq.com/M500001 VfvsJ21 xFqb.mp3 ?guid= ffffffff82 def4 af4 b12 b3 cd9337 d5e7 &uin= 346897220 &vkey= 6292 F51E1 E384E06 DCBDC9 AB7 C49 FD713 D632 D313 AC4858 BACB8 DDD29067 D3 C601481 D36E62053 BF8 DFEAF74 C0 A5 CCFADD6471160 CAF3E6 A&fromtag= 46 ', poster: array[i].poster, name: array[i].name, author: array[i].author, src: array[i].src,
这时,当我们点击下一曲按钮时,会执行next()函数,自动更换poster、name、author、src等数据。
音频API - AudioContext的使用 我们已经学会了音频组件的基本调用步骤,控制音频暂停,播放,转跳等功能需要相关API的支持,接下来,我们就看看如何使用API来实现这些功能。
音频播放暂停、播放等功能需要AudioContext接口,在使用该接口之前,需要使用wx.createAudioContext()创建对象。创建完对象后,我们使用播放音频 方法AudioContext.play() ,暂停音频 方法AudioContext.pause() ,跳转到指定位置 方法AudioContext.seek(number position) 来控制当前音频。
wx.createAudioContext()需要指定当前组件的ID才能使用,所以我们修改index.wxml内容如下。
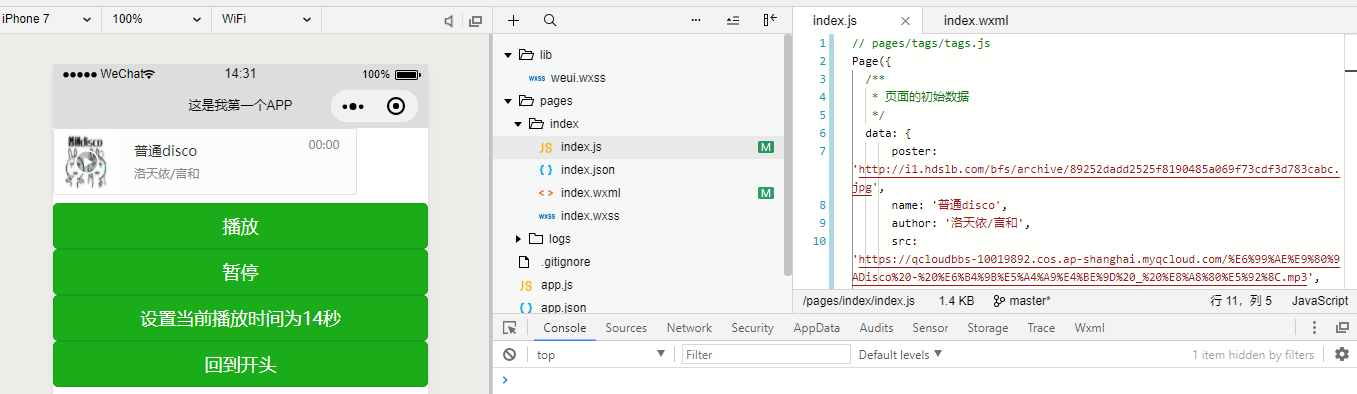
1 2 3 4 5 <audio id ="Audio" poster =" {{poster }} " name =" {{name }} " author =" {{author }} " src =" {{src }} " controls ></audio > <button type ="primary" bindtap ="audioPlay" > 播放</button > <button type ="primary" bindtap ="audioPause" > 暂停</button > <button type ="primary" bindtap ="audio14" > 设置当前播放时间为14秒</button > <button type ="primary" bindtap ="audioStart" > 回到开头</button >
这里id内的内容可随意指定,但需要记录其内容。接下来,我们在index.js文件的page()中,写出下面的代码。
1
2
3
4
5
6
7
8
9
10
11
12
13
14
15
16
17
18
19
20
21
data: {'http://i1.hdslb.com/bfs/archive/89252dadd2525f8190485a069f73cdf3d783cabc.jpg' ,'普通disco' ,'洛天依/言和' ,src : 'https://qcloudbbs-10019892.cos.ap-shanghai.myqcloud.com/%E6%99%AE%E9%80%9ADisco%20-%20%E6%B4%9B%E5%A4%A9%E4%BE%9D%20_%20%E8%A8%80%E5%92%8C.mp3' ,audioPlay () .audioCtx .play ()audioPause () .audioCtx .pause ()audio14 () .audioCtx .seek (14 )audioStart () .audioCtx .seek (0 ).audioCtx = wx.createAudioContext ('Audio' )
这段代码中,我们指定了默认的音乐数据,存放在data()中,然后创建audioPlay、audioPause()、audio14()、audioStart()四个函数,来控制当前音乐,在onReady函数中,我们指定了当前音频的ID。
音频API - InnerAudioContext的使用 新版的小程序中,官方推荐使用InnerAudioContext接口来替代AudioContext接口,并且后续AudioContext将不再维护。同时<audio>组件也不在维护,我们需要自己去写代码去实现前端展示功能。
InnerAudioContext接口使用和AudioContext比较接近,在调用前,我们不需要指定相关ID。我们可以使用下面的代码来实现基本的播放功能。
index.js
1
2
3
4
5
6
7
8
9
10
11
12
13
data: { status: "等待播放" , = wx.createInnerAudioContext()= true = 'https://qcloudbbs-10019892 .cos.ap-shanghai.myqcloud.com/%E6 %99 %AE %E9 %80 %9 ADisco%20 -%20 %E6 %B4 %9 B%E5 %A4 %A9 %E4 %BE %9 D%20 _%20 %E8 %A8 %80 %E5 %92 %8 C.mp3 '= > { status: "正在播放" ,
index.wxml
1 2 <button type ="primary" bindtap ="audioPlay" > 播放</button > <text > 当前状态:{{status }} </text >
InnerAudioContext接口参数较多,官方文档写的比较粗糙,为了看起来易懂,我将其做成表格。
属性名
类型
默认值
说明
src
string
音频资源的地址,用于直接播放。2.2.3 开始支持云文件ID
startTime
number
0
开始播放的位置(单位:s),默认为 0
autoplay
boolean
false
是否自动开始播放,默认为 false
loop
boolean
false
是否循环播放,默认为 false
obeyMuteSwitch
boolean
true
是否遵循系统静音开关,默认为 true。当此参数为 false 时,即使用户打开了静音开关,也能继续发出声音
volume
number
1
音量。范围 0~1。默认为 1
duration
number
当前音频的长度(单位 s)。只有在当前有合法的 src 时返回(只读)
currentTime
number
当前音频的播放位置(单位 s)。只有在当前有合法的 src 时返回,时间保留小数点后 6 位(只读)
paused
boolean
当前是是否暂停或停止状态(只读)
buffered
number
音频缓冲的时间点,仅保证当前播放时间点到此时间点内容已缓冲(只读)
同样,也给出了若干接口,本文只列出几个常用的接口,其他接口使用请见官方文档 。
参考上表,我们可以为我们的小程序增加暂停功能,修改代码如下。
1 2 3 <button type ="primary" bindtap ="audioPlay" > 播放</button > <button type ="primary" bindtap ="audioPause" > 暂停</button > <text > 当前状态:{{status }} </text >
接下来,我们优化下index.js文件代码。
1
2
3
4
5
6
7
8
9
10
11
12
13
14
15
16
17
18
19
20
21
22
23
24
25
26
27
Page({ data: { status: "等待播放" , , = > { status: "正在播放" , = > { status: "暂停" , = wx.createInnerAudioContext()= 'https://qcloudbbs-10019892 .cos.ap-shanghai.myqcloud.com/%E6 %99 %AE %E9 %80 %9 ADisco%20 -%20 %E6 %B4 %9 B%E5 %A4 %A9 %E4 %BE %9 D%20 _%20 %E8 %A8 %80 %E5 %92 %8 C.mp3 ',
总结 现在,你学会使用音频组件及API的使用了吗?关于API推荐使用InnerAudioContext,根据官方说明音频组件和AudioContext将不再更新。后续我将会对其他组件做详细的介绍。喜欢的小伙伴请持续关注本专栏 。腾讯云联合小程序给大家带来了小程序·云开发解决方案 ,为开发者提供完整的云端支持,弱化后端和运维操作,使用平台原生 API 进行核心业务开发,实现快速上线和迭代。欢迎免费使用!